
Many people have gotten used to having the ability to dampen undesirable sound, due to the noise-cancellation expertise present in, for instance, Apple’s AirPods Pro earbuds. However this tech will get you solely thus far: Noise cancellation works only for comparatively low frequencies, and the general listening to safety that earbuds can supply can be comparatively restricted. Earplugs or over-the-ear defenders are an possibility, however they block wished in addition to undesirable sounds. There are industrial options that go by way of sounds in particular frequency ranges, however these are focused at speech. As a musician who performs loud music, I need a option to defend my listening to and to have the ability to hear myself, my bandmates, and the viewers with excessive constancy.
For years, I’ve been attempting to enhance my private audio-monitoring scenario with out going to the expense of the methods utilized by skilled touring bands, which embrace custom-molded earpieces. Now, after numerous variations of wiring issues collectively, and even designing my very own audio mixers, I lastly have a DIY resolution that works inside an inexpensive funds. My strategy was to adapt an thought utilized in some pass-through methods, putting ambient microphones on the surface of sound-isolating headphones. I might seize the sign from these exterior mics at prime quality and feed it into the headphones on the desired quantity.
In fact, simpler mentioned than achieved. For my first prototype, I purchased a set of US $40 ear defenders that had a built-in AM/FM radio, which fed into small audio system within the ear “cans” and extracted the radio electronics to make some area. I then attached a series of breakout boards from my full-time employer, SparkFun Electronics: A $7 ICS-40180 MEMS microphone, a $6 TSH82 op-amp, and an $11 TPA2016D2 class-D amplifier. My preliminary testing went okay, in that I may hear the sound from the mics after I wore the defenders, however I rapidly observed an issue.
The writer wanted a correctly shielded grounded cable (1) to herald a sign from the left microphone (2) to the audio codec board (3), which is mounted on a {custom} circuit board (4) inside the correct headphone. Additionally mounted on the board are the ESP32 microcontroller (5) and a quantity management and audio jack (6). James Provost
I’m a drummer. Once I performed very gently on my drum set, the audio was clear, however as quickly as I hit a drum with even reasonable pressure, the pass-through sign grew to become rudely distorted, or clipped. Puzzled, I checked the specs of the microphone. The datasheet indicated it had an acoustic overload level (AOP) of 124 decibels. It appeared just like the microphone must be greater than able to dealing with an acoustic drum set—which, based on my calibrated sound-level meter, was producing a peak of solely 115 dB throughout my hardest-hitting taking part in.
The microphone’s breakout board applies a acquire of 64x, utilizing two levels. My first thought was to scale back this acquire. Perhaps the clipping was occurring at solely the primary acquire stage. Sadly, even with this acquire eradicated, the clipping remained. I then examined the uncooked MEMS microphone output by feeding it into some “professional grade” mic preamps. With this setup, I used to be capable of see that the issue wasn’t the amplification levels however that the mics themselves had been producing the clipping. By this check, I discovered a beneficial lesson: A mic’s listed AOP is the purpose at which the microphone will produce a ten p.c total harmonic distortion, and so noticeable clipping can truly begin to occur nicely under this degree.
I used to be on the hunt for an additional low-cost small MEMS mic that might deal with louder sound sources. I discovered the Vesper VM2020, with a formidable AOP of 149 dB! I spun up a brand new breakout board for the VM2020 and was testing it very quickly. Preliminary outcomes had been good—the VM2020 didn’t clip the sign irrespective of how laborious I performed! Nevertheless, as a result of middling sensitivity of this microphone (–63 dB), it was needed so as to add a number of acquire to the sign. Mixed with the microphone’s equally middling signal-to-noise ratio of fifty dB, this resulted in an excessive amount of hiss within the output for my musical wants. I went on the hunt for yet one more microphone. I discovered the $5 AOM-5035L by PUI Audio, which is an electret condenser kind. This microphone had three necessary specs: excessive AOP (135 dB), good sensitivity (–35 dB), and a greater signal-to-noise ratio of 75 dB.
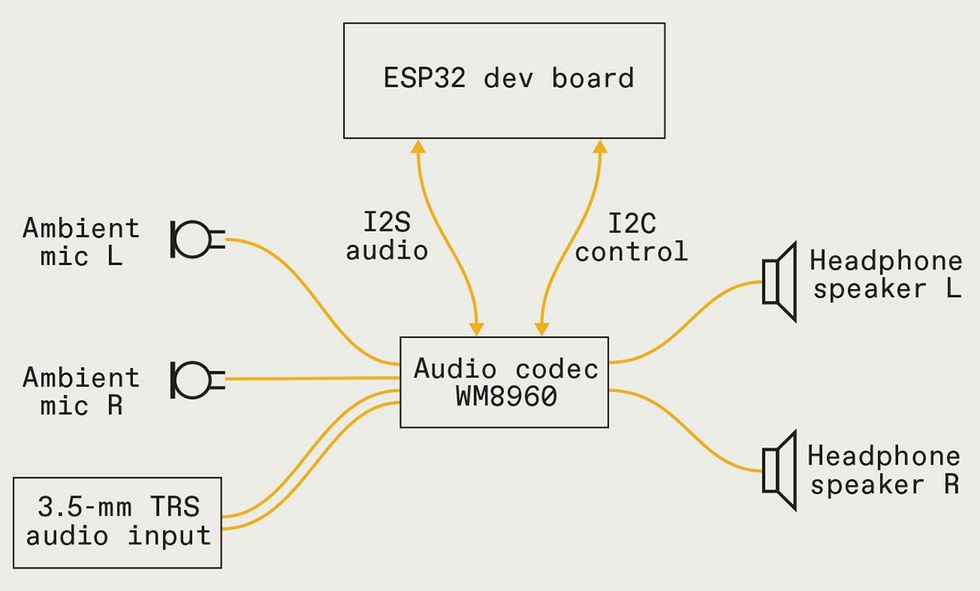 The WM8960 audio codec interprets incoming sound alerts—whether or not they’re analog from the microphones, an audio cable, or digital alerts acquired from the ESP32 microcontroller—into audible sounds {that a} wearer can hear. The ESP32 additionally configures the codec board on startup.James Provost
Across the time of discovering this microphone, I had simply accomplished one other breakout board for SparkFun. It was for the audio codec chip by Wolfson, the $18 WM8960. This board was extra suited to this venture than my earlier alternative, the TPA2016D2. The WM8960 has a quieter preliminary acquire stage that’s designed for microphones. Nevertheless, I now wanted a microcontroller to initialize and management the WM8960. I selected the $10 ESP32 as a result of it might enable me to function the WM8960 and likewise settle for audio through a Bluetooth connection from, say, my cellphone, and stream it to the WM8960.
I created a motherboard PCB to make sure every thing fitted properly into the correct ear can of my hacked ear defenders. On the surface of every can I positioned a microphone to offer stereo sound. (An in depth step-by-step guide is obtainable on the SparkFun web site.) Quickly I used to be having fun with a clear audio sign with no clipping and no hiss throughout my drum rehearsals. However in a final wrinkle, I observed that typically there was a small whining noise that may fluctuate in pitch within the left audio channel. This grew to become extra pronounced when the batteries had been getting low, and if I turned off the ESP32’s Bluetooth, a few of the noise would go away. In an try to unravel this, I first added a separate and devoted floor connection from the left microphone again to the electronics in the correct ear can. This diminished the whine however didn’t take away it completely. I lastly used a correct shielded microphone cable to attach the microphone to the WM8960. This eradicated the noise utterly. Success! I’ve been taking part in away with protected listening to, and for lower than $100 and a few bench time, you can also have your very personal {custom} set of Superheadphones!